

Organized Chaos on Departure Day
October 13, 2015
I gave Chef Renauld a big hug and a big thank you last week as I departed his home in Libby, Montana. His home and gigantic workshop and garage (plenty tall enough for La Lair) was our full-time work for three months. La Lair was finally modified and ready for travel on October 6th. And as I departed, I took the photo below which shows an organized chaotic mess BEFORE I developed a useful methodology for user-friendly access . . . .


I'll back-track and walk through the photos of the modifications as they evolved. Here's the bedframe foundation.

I made a kayak holder with left-over ABS and metal strips . . .

And then I fitted it under the bedframe to decide where to attach it.

And here's where we finally decided to install the kayak holder . . . .

When the kayak position was decided, we continued with the bedframe construction of attaching plywood tops.

Below is a photo of the finished bench and leaflets. Although we had assumed and read good reports about the hardness and easy-working factors of African Padauka wood (the red wood, it's naturally red, not stained), Chef Renauld and I agreed that those reports were very wrong. It is a difficult wood to work with; never again.

For example, attaching the leaflets' legs to the Padauka which
splinters easily was not so easy. Chef Renauld screwed two aluminum
strips to each leaflet to make it more light-weight for me to lift and
to hopefully avoid splintering the wood.

We also bolted the bedframe to the floor; two little holes in the metal floor. We weren't going to bolt it, but neighbor Ernie who's Chef Renauld's consultant told us "Bolt it! you'll regret it if you don't".

Here's the kitchen metal frame spray-painted with Rustoleum.

And
here's the kitchen desk to be bolted to the metal frame. It will hold a
2-burner propane stove and an electric NuWave Induction cooktop.
Here are the mattress tie-downs freshly painted white; I had pounded the corners with a heavy hammer and Chef Renauld drilled the holes. The longer tie-down (riveted directly behind the driver seat on the upper rail) will hold a hanging cloth organizer for my mittens, hats, rain gear, and all those "little" things that often get lost in the clutter but I need immediately.

Here's my propane tank tie-down; two left-over black ABS strips and a metal strip painted black. Look at the first photo in this blog, lower left corner of the inside cargo area near back door and you'll see my propane tank.

Here's the propane tank holders without the tank; one strip riveted flat to the metal, with two inserted loose ABS strips with simple tabs with bolts and nuts.

And the water container shelf was bolted to the wheel well as well as bolted below the 3/4" rubber floor mat. This task took three hours, not to bolt it but to use the magnet to find all the washers and nyloc nuts I kept dropping behind the ABS sheet while Chef Renauld pressed-in the bolts. We laughed ourselves silly while doing this operation. It was ridiculously funny to spend three hours doing something that should have taken 30 minutes.

And now for those of you who are ProMaster Builders too, you may ask if any of these modifications have been advantageous, and I have no definitive answer. Only time on the road will tell if the curtain, the sparse insulation, the vent, the bedframe and all the other modifications have been worthwhile. Next year, I'll do an assessment on it all.
September 30, 2015
A few days ago Chef Renauld asked me to get a Punch List ready, and that's good news! It means the ProMaster Build will soon wrap up for the year. The "kitchen" will have to wait until next year. I will be able to cook inside La Lair, but it will be a temporary set-up.
While I'm getting my Punch List ready, Chef Renauld is putting together the bedframe which doubles as a computer table, dining table and couch during the day. He's setting the self-closing concealed hinges (three per leaflet) with 1/8" metal support bars so that it won't rattle or vibrate apart after one-quarter million miles.

These surface mount concealed hinges are unique. I looked everywhere for these hinges on the Internet last year and finally found exactly what I wanted. When the leaflets are down or up, the hinges are entirely concealed from view, and there is no gap between the bench and the leaflets when it's lifted up (when it becomes a flat wood surface to hold the 53" x 75" mattress). For the past few days, we've been drilling and tapping umpteen holes in the metal bars and Padauka wood for screws to hold it all together.

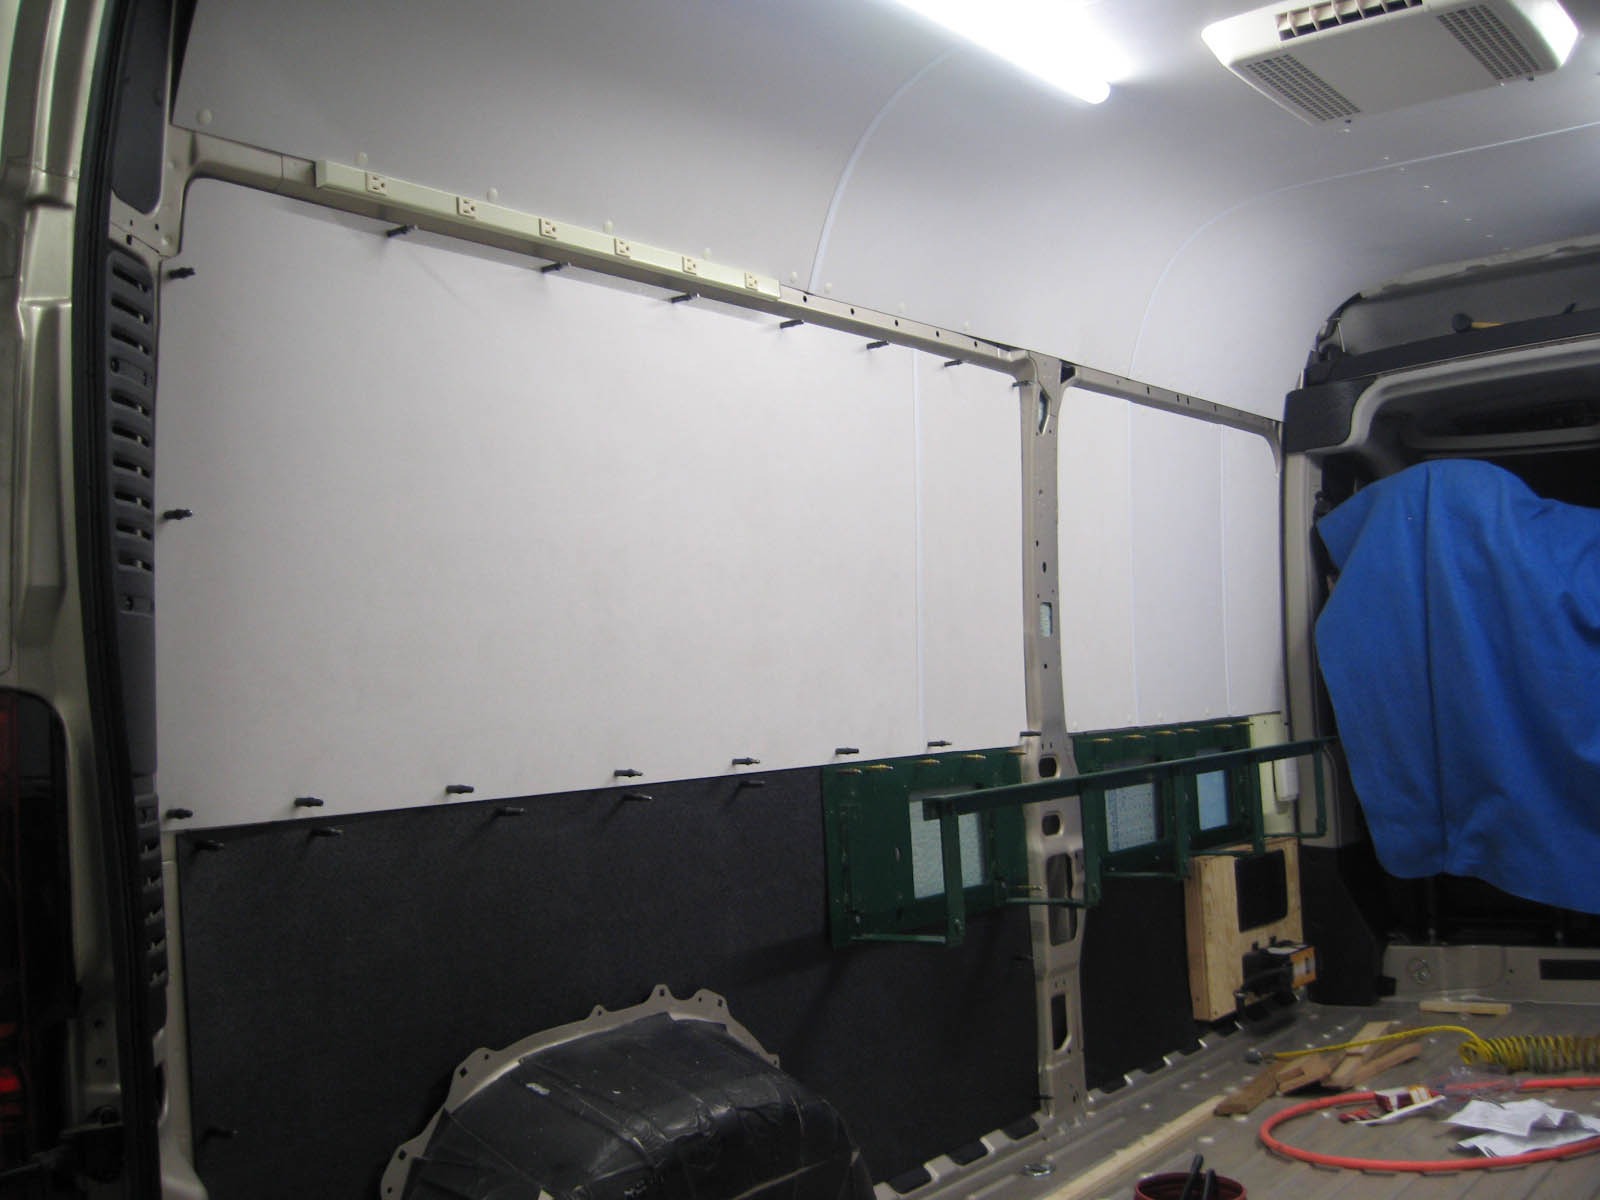
This past week, I discovered the benefits of using a band saw. It cuts straight lines in ABS sheets without melting the ABS; it cuts beautiful clean lines. Jigsaws melt ABS and butcher the cut line with melted globs that requires too much sanding to make it smooth. Also, I've discovered the difference between ABS sheets that are .062" and .093" and .125" thick. I purchased all three thicknesses. In the photo below, I decided to go artistic and mix two black ABS sheets .062" with a centered white ABS sheet .093" on the wall behind the driver's seat. I also used the .062" black ABS on all the walls below the waist-rail.

The next afternoon after installing the black ABS with cleco's, which
was a warm day about low 80s, I noticed large gaps (buckling, expansion)
of excess ABS between most of the cleco's which were about 8 and 9
inches apart. There were absolutely no gaps when we had inserted those
cleco's the day before. So the next morning when it was cold (about high
30s) I inspected the black ABS installed sheets and the gaps were gone!
The black ABS had expanded and then contracted; it was flat and neat
and tidy as originally installed. So, a word of wisdom for those of you
considering ABS sheets inside your van . . . if you buy .062" thick ABS
for covering walls or ceilings, you'll be disappointed with the
expansion/contraction of the too-thin ABS sheet for walls, best to use
it for little projects where it won't matter. I haven't seen any
expansion/contraction with the .09" and .125" white ABS sheets installed
on walls/ceiling.
While Chef Renauld is working on the bedframe, I'm busy with the Punch
List. The beginning of the kayak holder is shown below, two 1/16" metal
strips with 90 degree bends (pounded with a hammer) and one ABS sheet
with two 90 degree bends (melted with a heat gun). I'd like Chef Renauld
to screw this holder under the bedframe where my kayak will be stored.

I'm also designing the kitchen wall; three black plastic shelves will
be bolted to the wall above the wheel well. You'll notice that I
replaced the black ABS sheets with white ABS sheets behind the driver's
seat above the waist-rail. I didn't like the expansion/contraction issue
at eye-level. Below the waist-rail, it won't be noticeable and I'll
learn to live with it.
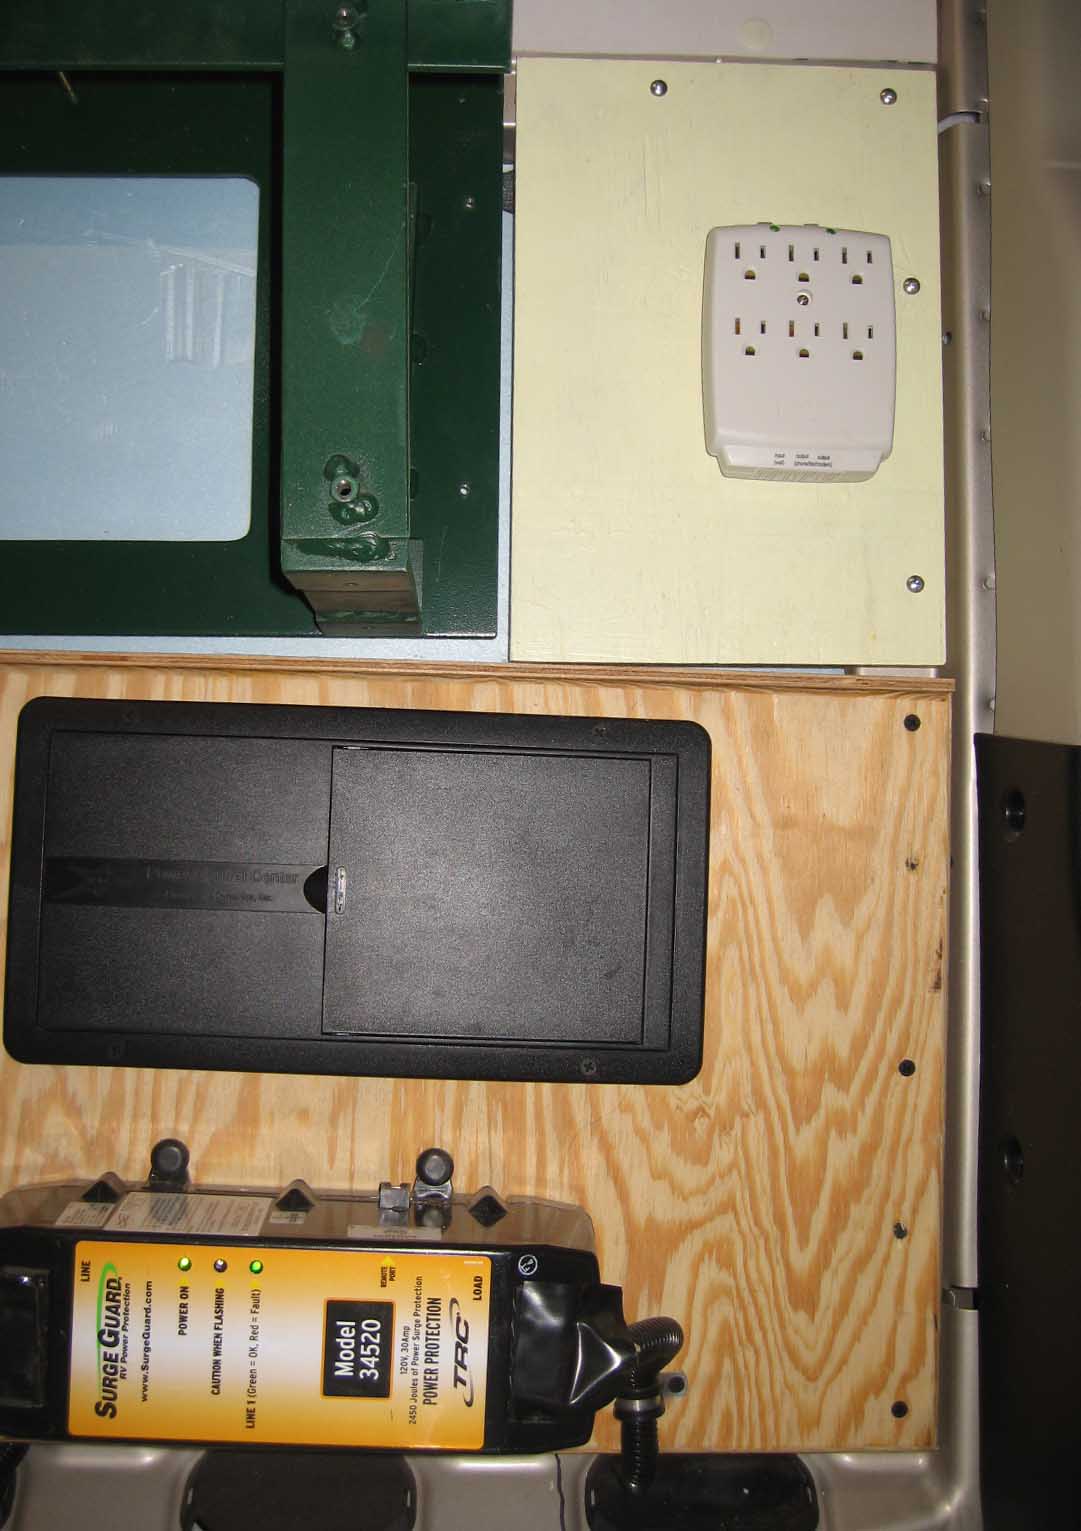
Directly behind the driver's seat (and at the foot of the bedframe, desk, dining table area) is another outlet.
The weather here in northwestern Montana has been below freezing temps
until the sun peeks over the eastern mountain range, which is not until
10 AM. So this nomadic Texan is anxious for a southern route to return
to more pleasant temps!
Update later same day . . . . finished the kitchen shelves installation late today. I had purchased plastic brush boxes to hold up to 4 1/2" diameter plastic containers of rice, barley, flour, seasonings, quinoa, coffee, tea bags, dried veggies and mixed fruits, etc. my "pantry". I used another ABS sheet on the back to double-up for strength, then drilled holes and used bolts with nylon nuts to attach three shelves. The shelves are staggered and asymetrical to accommodate a range of short and tall containers.

And then Chef Renauld helped me to put it back on the wall and we did the final 1/4" holes for the clips. Here's the finished kitchen wall . . . .

The white elongated thing on the right wall is a compact towel rack; it folds out and there are four racks.
Final and Third ABS Ceiling is Installed
Monday, September 21, 2015
The final and third ABS sheet for the ceiling was finally installed today, first with cleco's . . . . .

and finally with white panel clips. In the photo below, on the high rail on the left is a 120 six-outlet strip, and on the opposite side is a FastTrack Rubbermaid storage system rail. A second FastTrack rail will be installed on the waist-rail as well.

Another ongoing project is the little itsy bitsy curtain rod . . . the Ikea Dignitet. Final curtain installment will be next week.

In the photo above, you see two mounting holes for rivets. We later added a third hole on the premise that the constant pressure of the wire line would need more support. I used Threadlocker Blue Gel glue on the bolts by the way.
Here's what the rod holders look like riveted up along the wall next to the overhead bin. The first photo is behind the driver; second photo is behind the passenger. As typical with the ProMaster, the left and right side are not mirror copies of each other.


Meanwhile, wonderful fall weather has arrived at Libby, Montana. Mornings are high 30s and some days it doesn't get warmer than the mid 60s. But today, it was a pleasant day to be outside and so I decided to sew. Oui, Chef Renauld has a sewing machine! How many metal and woodworking men do you know who also own a sewing machine? This good kind man has everything!
About ten minutes after I self-timed the photo below, two spotted fawns walked by very close to the porch. They are daily visitors; every day I bleat to them "hello" hoping they understand I'm a friendly alien. I stealthily went back for my camera and when I re-appeared on the porch, they had slipped into the woods.

I'm making a curtain to divide the cargo and cab spaces. The curtain will be similar to hanging two gigantic hotpads (hotpads as in handling pots in the oven). One side is white duck cotton, the other side is an off-white muslin, and inbetween is Insul-Bright (mylar content, blocking heat); all are machine-washable fabrics in cold water, line-dry. Yes, Insul-Bright is the very same material I glued to the cargo interior metal. Hopefully, the curtain will block lights at night (when I'm sleeping in a well-lit parking lot for example) and block heat when the cab window area gets too hot on sunny days.
And here's the metal shelf in-the-making for the two water containers . . . discussed more on my ProMaster Build page. The water containers have handles and spouts and yes, they'll be secured with a strap or bungee cord while traveling. The cosmetic touch-up of the wheel well (seen here with patchy sound-deadening material) is a forthcoming winter project.

Chef Renauld finished welding the legs on the water shelf yesterday, and I spray-painted
it black. Tomorrow one more light coat and while the paint dries for a few days, we'll re-connect the AC unit, install and wire two fluorescent ceiling lights and install a 120-outlet behind the driver's seat.
Ramp and Step Stool Storage
Thursday, September 17, 2015
Having quick and effortless access to my telescope ramp when unloading and loading my 60-pound electric bicycle is important to me.

I decided to hang the ramp on the back door and make a "denim pillow case" with pockets to cover the ramp. Chef Renauld made and welded the L-brackets, I painted them black, and then we riveted them on the door (at appropriate places, we took the black ABS cover off to mark those rivet holes).

Then with a jig-saw, I cut a 30" x 10" piece of 1/16" black ABS to form the tray at the bottom. I clamped it down and used a heat gun to make the 90 degree bends in the front and two sides.


We're postponing the installment of the third ABS sheet on the ceiling until we finish the water container rack to be bolted above the wheel well on the passenger side. It will be 34 inches long to hold two water containers and a five-liter box of Burgundy. Chef Renauld cut out the mid-centers at the two edges so I can put each container on its side and use the spout.

The water rack will be painted black, and I'll be cutting out a piece of black ABS sheet to cover the wall below the waist rail. This is what that wall looks like now.

Installing Second ABS Sheet is Laborious
Wednesday, September 9, 2015
ABS is a finicky material. It melts with any normal tools such as drills and jigsaws, and it chips if we stop/start the table saw midway through the cut, and it needs a backerboard for every little thing, and if you use a heat gun, it can melt and discolor and get easily indented where you don't want an indentation, and if you clean it with Acetone, it will melt (use vinegar or lacquer thinner but do it quickly, wipe it dry as soon as it's clean). And because it's so thin, any ABS sheet over five feet long wobbles and flops everywhere, like an out of control Anaconda snake even with two people handling it. ABS truly wears on one's patience.
We've already installed the first ABS sheet in the ceiling. Here's what the second ABS sheet looks like . . . . one more to go.

Chef Renauld and I will be installing this second sheet tomorrow, and
we're not looking forward to it. It will be installed first with
cleco's, then minor adjustments, then back outside for fine-tuning,
drilling 1/4" holes for 12 white clips at the top rows, then beveling
the 5/16" holes for 12 white clips (the wiggle-room factor) at both
lower side edges, then back inside the van for its hopefully last
fitting for keeps. Just toting this ABS sheet inside and outside one
time is an ordeal; multiply that by four or five times and you'll
understand why we're calling it a night.
Thursday, September 10, 2015 update; we installed the second ABS sheet. Here's what it looks like . . .

Update, Saturday, September 12, 2015
Photo below shows third and final coat of Shellac on high-maintenance but beautiful African Padauka, two benchseats with two leaflets. Will be ready to assemble as bedframe in two days.

Installing First ABS Sheet is Laborious Ordeal
Monday, September 7, 2015
Since July 14, Chef Renauld continues to patiently help me build my ProMaster into a feminine lair on wheels. There was a short respite last week. I packed La Lair and we waited for an evacuation phone call due to a wildfire about eight miles south of Chef Renauld's place here in Northwestern Montana. The wind direction saved us from having to leave, but south of us, about 40 homes were evacuated. The next day after a brief rain, the evacuation order was rescinded.
The ABS ceiling is turning into a project to be done "only once in my lifetime". I don't want to do this again, along with tiling a floor and pulling out rusty nails on a steeply-pitched metal roof. Chef Renauld's cool exterior helps me to keep my sanity. Why did I think an ABS ceiling was going to be easy?
The ABS ceiling installation is a two-person job. Together, we toted an unwieldy piece of ABS sheet (about 6 by 4 feet) inside the van and outside on the work table, perhaps a total of four or five times, over three days, always with an eye on unexpected short rain storms from now a cloudy black sky instead of the usual smoke-filled hazy sky. For three days, we were measuring, refitting, doing a second cut, cleco'ing, measuring, drilling small holes, measuring, and measuring, and measuring again, toting it back and forth, inside and outside. Why the facetious time devoted to endless measuring? Because the 24 holes for the white clips, one 7" hole for the vent, and one small hole for the electrical wire had to be EXACTLY placed. No wiggle room for errors. Here, Chef Renauld drills the first holes for the clips. He follows it with a beveled drill.

The only wiggle room we allowed (thank you to a suggestion by commenter Zoomnx) was a 5/16" hole for the 12 clips which have 1/4" stems along the two bottom edges of the ABS sheet. The 12 holes for the two center ceiling strips directly overhead were drilled precisely at 1/4" for the 1/4" stems; no wiggle room. The theory is that the ceiling will shift slightly with the van movement on the road, and since it has to wiggle somewhere to prevent cracking or buckling or worse, popping all the clips, it's best to allow wiggle at the two bottom edges. Only time will tell on the road if this theory is true.
We were apprehensive when we finally installed the first ABS sheet with clips; were we forgetting a little detail? It all looked OK. One ABS sheet up, two more to go . . . . if you look closely, you can just barely see all 24 clips. The front edge is covered with PVC division molding, ready for another ABS sheet. The red arrows point to my winter project; the rear metal will be covered and glued with something attractive.

Today, I finally finished sanding the last of four panels for the bedframe.

Each panel was glued together and then weighted down for 24 hours each.

Sliding Door Interior ABS Covering
Tuesday, September 1, 2015
Chef Renauld and I were ready to install ABS sheets on the ceiling of La Lair, but a fellow-ProMaster conversion builder convinced us to re-think that strategy (see comments following my previous blog). We decided to "practice" first with ABS on the sliding door behind the passenger seat. As mentioned in my previous blog for the August 27th update, we learned that ABS can chip easily when using a saw blade, and it melts when the drill heats up.
The top section of the door was easy enough to install. But the mid-section of the door was concaved differently at the top and bottom. We decided to use custom-made metal standoffs with short pieces of 1/8" metal strips. Because the curvature of the mid-door section (designed by Fiat/Chrysler to install a large side window) was different at the top, sides and bottom, Chef Renauld made wooden forms for the three different angles. After drilling holes in the metal pieces, he pounded the angle in a vise with a hammer over the wooden forms, and then made notes of their locations.

Here, each angle is formed in a vise with a hammer over a wooden form.

Then
with cleco's we installed the standoffs to line-up with the clips in
the upper ABS covering. Meanwhile, we sawed and used a piece of plywood
to make a template for the future ABS sheet.

Once the template fit perfectly, I used a jig saw for roughing out the
corners on the ABS sheet. Then with both a power sander and hand
sandpaper, I beveled all the edges smooth to match the template. Then we
measured precise hole locations on the ABS, drilled and beveled those
holes, riveted all the stand-offs including a support strip in the
middle, and finally replaced the insulation. As you can see on the
insulation in the photo below, my bicycle handles had poked holes in the
insulation a few months ago. So we used the 1/8" thick ABS on the
mid-section of the door to take more abuse. The upper-section of the
door is 1/16" thick ABS.

While Chef Renauld held the ABS up
against the door, I snapped in the white clips with a tap of the hammer
on a piece of plywood over the clip head.

Now that we're more familiar with the cons/pros of working with ABS sheets, we'll move on to the beast, the ceiling.
Preparing to Install ABS Ceiling
Sunday, August 23, 2015
There's light at the end of the tunnel! All four metal firring strips on the ceiling were finally riveted. I said au'voir to the cleco's!

Chef Renauld and I will soon bend three pieces of seven-by-four-foot white ABS sheets onto the ceiling and affix with white clips. The ABS seams will be joined with white division molding and the outside edges with white j-trim molding. If anyone has a link showing how to snip j-trim for 90-degree corners, please leave a blog comment, thank you. I searched the Internet; couldn't find anything.
In the photo below, you can see what's going on under the future ABS ceiling. Next to the Insul-Bright fabric which is lined everywhere inside including the crossbars, there are 5/8" Styrofoam blue boards between the crossbars as well as along the high cornered walls (invisible), plus 1/4" Polystyrene Foam boards also along the high cornered walls. The 1/4" stuff only has R-1 value, but it bends easily without breaking which is why I like it. Also, the 1/4" Polystyrene Foam doesn't squeak. The only foamboard that seems to squeak is the 2" Styrofoam board, which I probably won't use at all. When the ABS ceiling is done, I'll take La Lair for a squeak-test down a pot-holed dirt road.
The red arrows in the photo below point to the type of bend we're aiming for in the ABS sheet; the ABS is .06" thick, so it should bend easily. And hopefully the ABS will clamp easily until we get the holes lined-up with the metal firring strips and the white clips punched in the holes. If the ceiling ever needs to be removed, it can be done fairly easily.

The overhead bin area is done; the gray upholstery was re-attached with the original clips. The ABS sheet will fit right up against the upholstery material (we hope!).

Meanwhile,
the pretty wood for the bedframe continues to be under construction.
Still much to be done; sanding, sealing, shellacking, etc.
We're still under daily fire threats here in Libby, Montana (northwestern Montana). Today, we were bumped up to a fire stage 2 restriction, so no welding for awhile. It's extremely dry and hot during the day. When we take the doggies for a walk, it's a dusty affair.

In case you're wondering why I'm wearing my bike helmet, it's because I
have an attached battery-operated siren on it to scare away loose dogs
that chase bicycles. Also, as a solo traveling woman, the good folks at ProMaster Forum advised me to purchase a cheapy alarm.
I used it once to scare away a battle-scarred almost hairless groundhog
during a stare-down contest between us on a trail. I don't normally
wear my helmet for our daily walks, but Neighborette Maryann called and
told us this afternoon about fresh bear tracks she saw this morning on
her walk. Her hubby Gary checked it out; he said it was a young Grizzly
bear track, not a Black bear track. So, apparently, Mama bears and their
young are coming down lower in the valley where we live to look for
berries and water.
This coming week promises to be exciting when I see a real ceiling in
La Lair! We'll be installing three large unwieldy ABS sheets, drilling
precision holes, plus doing the precision-cutting holes for the vent and
AC unit. I predict the ABS sheets and installing division molding
between them will be like wrestling with a bunch of Grizzly bears.
UPDATE August 27 - Couple of new developments. The ABS is .06" thick
and chips easily when a blade isn't fine enough. When it is fine, it
slightly melts the ABS although the melt can easily be sanded smooth.
Fine line to walk when using ABS! When we drilled holes, we started
small and went up to the 1/4" drill bit on the drill press. The drill
bit needs to be cleaned off frequently, lots of curly plastic.

But,
once we made small locating holes in the ABS (for the clips), then
final 1/4" holes (always using a backerboard), all went well enough.
Here's before and after photos of the ABS fitted on the upper sliding
door. The mid-part of the sliding door is different; not sure how we're
going to affix an ABS sheet there. Need a Plan A.


To come up with Plan A, I sat inside the van and studied the
mid-section of the sliding door which has 80-degree angled and curved
borders. After pondering overnight, I drew a sketch for attaching
80-degree custom-cut ABS set-offs at eight places around the border.
Chef Renauld and I went back and forth with ideas on the sketch and he
suggested 1/8" metal plate set-offs which I like better. Here's what
Plan A looks like so far.


Not all Plan A's work. Plan A for joining the corner frame pieces of
the African Padauka was with a Kreg Jig, using sideways screws. But
disaster struck, the Padauka is too hard and splits very easily.

Plan
B is to screw metal plate joiners for the corners of the African
Padauka frames. Photo below shows routing work for inlaying the metal;
very tedious considering there are about eight pieces to rout.

Two days later after routing was done, we used biscuits and Gorilla glue to put together the first bedframe section; will be clamped 24 hours. Three more bedframe sections to assemble, then sand and seal and shellack.

5 comments:
 Howdy, and gee I was looking for an excuse to post a comment on your project (new Promaster camper wagon in progress here too)
Maybe your engineer is well versed with this product, I don't know... :)
http://dss.polyone.com/docs/ABS%20Family.pdf
Coefficient of Thermal Expansion (ASTM D-696) in/in/°F x 10-5 4.2-5.6
So... 0.000056" heave/shrink per inch per degree Fahrenheit
60" = 0.00336"... installed at 75ºF, at 125º 0.168", at 140º 0.2184", at 0º 0.252"
Right, not much heave so maybe some gentle ripples in ceiling BUT...
Over 100's of cycles the movement may be enough to malform push plugs, work them loose or even shear a few of them.
So? Provide some slot travel in the mounting holes put into the SP-9010, does not have to be much, align with longest distances.
ALSO: slightly bevel cut/drilled edges - cracks begin and propagate at sharp corners, toughen up the fastener bores immensely by rounding off the sharp corners, shaved/milled/sanded doesn't matter as long as no sharp edges..
And... on miter work.. dunno but sun warmed plastic and gentle persuasion with a straight safety razor, with scrap sheet stock inserted to maintain molded form?
PS: I have a 72 and 73 Airstream as project trailers, user Wabbitteer at airforums.com... Just sanded and slightly beveled the edge of a cut ABS sheet, it does "chip" easily, you're probably right about keeping those cut edges smooth, will do, thank you for tip. We're thinking that with 200 white clips on hand, and if we space the clips approx 8" apart or so (stress equally spread out), if any clips do malform or shear off, just replace the clip?
- What I've seen is one locale will randomly act as sheet anchorage; and all dimensions heave to/fro about that fastener group... and yes, maybe y'all have sensed I've replaced $100,000's of damaged lexan/polycarbonate long ago and far away back when... I apologize if it seems to be obsessing on minutia.
Forming the sheet to the convex might be it's own set of problems (I run and hide after tossing that in)
- the 15664 retainer has stem size of 5/16" (0.3125") with 11/16" head size (0.6875")...
perhaps: sheets' physical center fastener lugs be drilled to stem size, next zone drilled to 11/32" (0.34375") while on the periphery lugs be eased to 7/16" (0.4375")? That would provide enough slop the 'toggle' wiggle factor of the push plug might not ever see dislodging force...
So - the roof stringers are inleted with the 15664's recommended Hole Size: .030"-.060" smaller than stem diameter, and all sheet bores initially match that, then relax/ease hole sizes beyond center of the panel... .
oh - if not using 20,000rpm and near zero plunge force to produce superfine dust as drill shavings how is the panel holding up to drilling?
I think I'll sit on my hands now and watch a while :)
- Lay it out at room temperature, then sun warm the plastic, then worry a drill through by hand?
Polycarbonates blah blah need a special ground flute (90º cutting edge, scrapes/melts plastic into shavings) drill with a 60+° point angle for drilling holes - if one tries a self-feeding metal bit they grab gouge and chip once it is fully engaging the plastic.
Your shop Boss looks like he could grind a tired HSS bit into something workable in a few tries, just doing it by eye - or even cheat and buy one, or use a bit sharpener jig set to +60º :)
Patience, a steady hand with a 'V' shaped flat-bit and hand-drill might get the job done.
Backer board ALWAYS.
The 20,000 RPM thing is learned from Airstreams, nothing beats RPM & light touch to remove bucked rivets or make new holes in aluminum :) ie: a high speed cutoff tool or roto-zip or dremel etc. etc. with your choice of chucks or reduced shank bits...
Crimey, and I said I was a gonna sit on my hands and not run my mouth :/


Moving Along with Various Projects
Tuesday, August 18, 2015
It's been about 35 days of togetherness, me and Chef Renauld. Seems
like we're forever planning, painting, staining, planing, cutting,
welding, and measuring umpteen times, and fussing sometimes when there's
differences of opinions. Happy to report that Chef Renauld and I are
still great friends. This project will be a lifelong memory for both of
us.
Yesterday, we removed the shroud to the roof AC unit; it needed to be re-wired anyway to relocate the wire along the side of the crossbar instead of under the crossbar. Today, we attached with temporary clecos two metal firring strips to the cross bars on both sides of the AC unit. As soon as the special order of 5/32" rivets arrive via USPS, we'll pull out the clecos and rivet the strips permanently. I also inserted 3/4" 4-foot sections of Styrofoam between the firring strips and Insul-Bright fabric previously glued on the metal ceiling.


When all four metal firring strips are riveted to the crossbars, we'll bend horizontally three 7.5'x4' white ABS sheets (1/16" thick) and attach them with white plastic retainer clips to the metal firring strips and the topside long metal troughs on each side.
Getting to this point required priming/painting four 3/8" thick metal strips that are two inches wide, setting a laser on the ceiling to mark a straight line down the length of the ceiling, and planning where the holes will go on the firring strips to match-up with the ceiling's non-symmetrical metal crossbars.

Then,
with stools and anything else we could use to balance the 12-foot
flimsy firring strip, Chef Renauld used his drill press to make those
strategic holes for the future rivets.


Then, with a ladder and anything else we could rig, we suspended each firring strip near the ceiling and aligned with our laser marks. After Chef Renauld drilled the holes into the crossbars, I cleco'd the strips.

The ceiling rear of the van is tricky because there's no crossbar. So Chef Renauld made four crossbars, one for each firring strip.

Meanwhile, the pieces for the bedframe await assembly while we work on the ceiling.

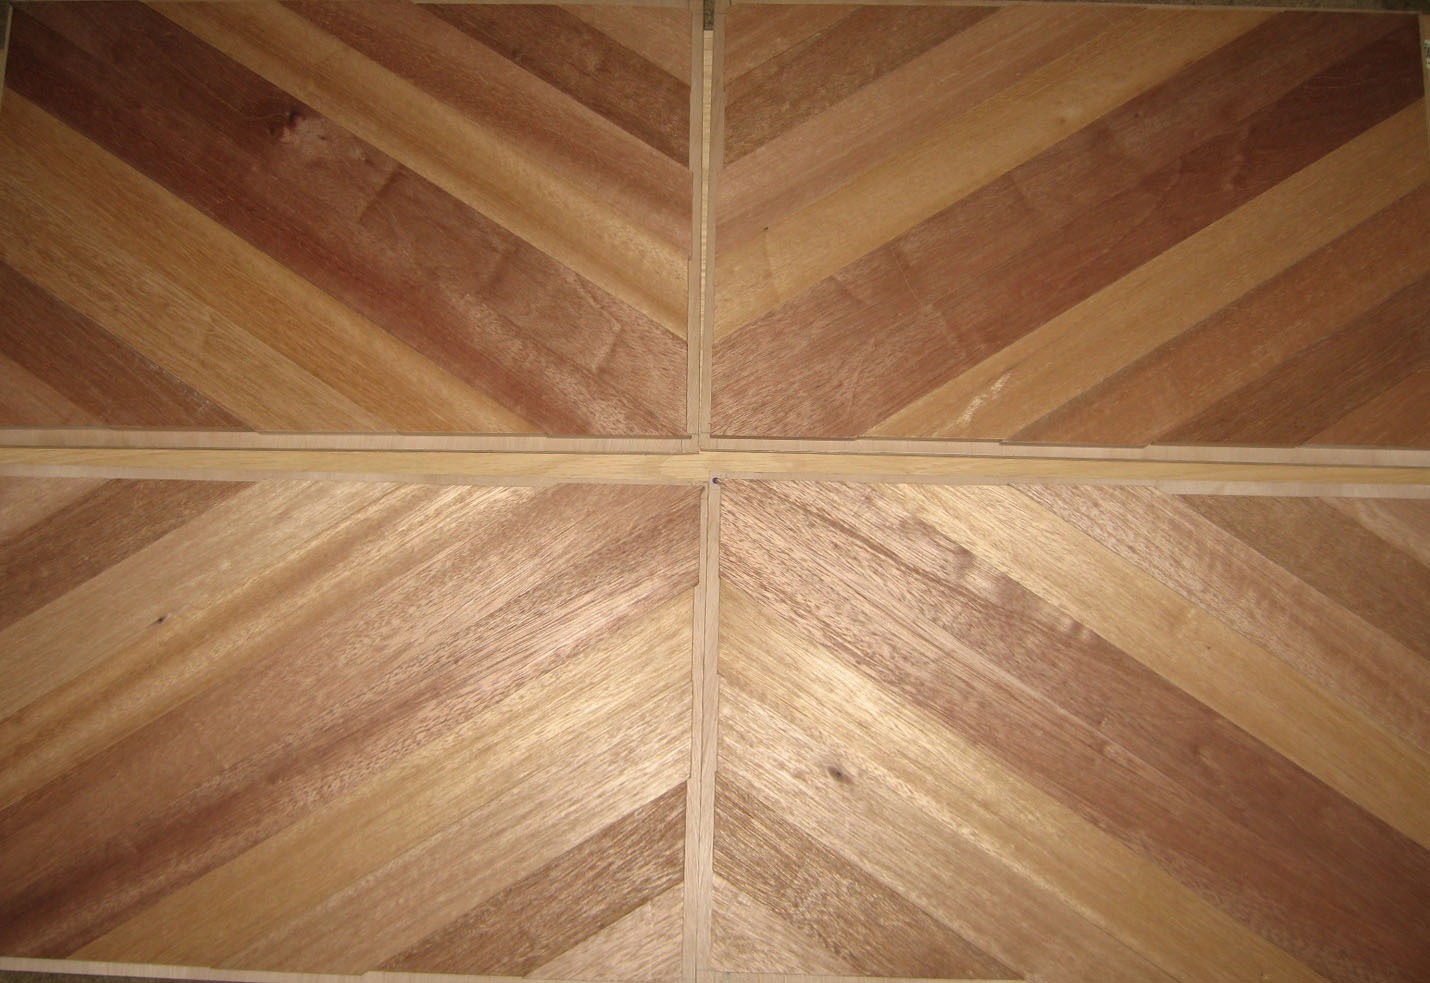
It will look a bit like this; Mahogany slanted inside the African Padauk.

Each
piece was planed umpteen times . . . over several days. I'm the
"anti-snipe" person in the rear with a square "roller" that I move
manually.

And
when the pretty wood is assembled into three pieces (one long bench and
two leaflets) which is the 75" x 53" platform for the mattress, the
other oak pieces will be assembled under the bedframe. I stained and
shellacked the oak pieces even though they won't be noticeable.

We've
had a couple of weeks of 100-degree-days and daily threats of forest
fires (and smokey skies from Idaho, Oregon and Washington's wildfires).
It was refreshing to visit the swimming hole with the doggies.

I didn't jump in, too cold for me. I took the thermometer to prove Chef
Renauld wrong - he said the water was "Nice!". Surface water temp was
under 70 degrees; probably three feet below the surface where private
body parts really matter, it's maybe 55 degrees? I'd call that "a rude
awakening", definitely not "nice".

At the trailhead to the swimming hole is a large fir tree stump. It was
cut by perhaps two men with a two-man saw more than 100 years ago. They
cut holes high on each side of the tree, then wedged a flat board
inside the holes, hoisted themselves up on the high boards, and stood on
the boards to use a two-man saw. The reason for cutting high up on the
trunk was supposedly because these huge trunks near the ground contained
too much sap which is sticky and glue-like, and would clog the saw
teeth, so they sawed higher where there was less sap.

And one afternoon, I took a bike ride up the road to listen to some folks gathering for alittle fiddling and pickin . . . .
Plenty of Mama Deer with fawns along the road lately; deer roadkill is a
fact of life here. Neighbors put water out for them and keep a watchful
eye on them. This doe seemed street-smart; she waited for me to pass.

Looking forward to tomorrow's progress!
Tedious Un-Rewarding Prep Work
Friday, July 31, 2015
Two weeks of tedious un-rewarding prep work . . . plus 101 degrees
equals humourless days. This is no fun. Lately, we've spent a lot of
hours looking for misplaced items, too. Hopefully in another two weeks
our tedious humourless work will blossom into something wonderful. It's 4
PM and I'm getting hot, tired and cranky . . .

I've been tapping holes for many screws . . .

Chef Renauld squares-up his saw for another task . . .

Last
week, Chef Renauld cut 1/16" metal into thin firring strips, realizing
later the heat from the plasma cutter warped them all slightly, and
making the workshop a bit smokey, too.

So
we went to town to pick up straight 1/8" metal firring strips two
inches wide. I primed and painted them all with Rust-Oleum. We'll find a
use for them.

Chef Renauld and I spray-painted the metal plates for the bedframe.

He's been beveling numerous holes to counter-sink the final screws for the plywood to be attached later.

He rivets the stand-offs on the two vertical bars, one very small step toward our large goal.

We
spend much time figuring out how to attach the folding legs to the
future drop-leafs to make sure they'll clear the future hinges. We'll
cut the legs down to the correct height later. Sounds simple but it
turns out to be complicated. There is a forward, backwards, and
wrong/right position when attaching the legs! Who would have guessed??

Chef
Renauld designs the platform for the mattress; we are using contrasting
hardwood to hopefully hold many screws to endure many bumpy miles.

The
scarlet color in the design is African Padauk (see red below) and the
yellow is Mahogany (see gray-brown below), purchased last week.

It's
time to quit for the day, take the doggies for a walk to Chef Renauld's
favorite swimming hole (mountain water creek). I'm going to kick back
with a glass of Burgundy and put two Gorditas on the pizza stone (on the grill outside). Hopefully I'll redeem myself.

Bedframe Supports
Tuesday, July 21, 2015
Our first project is the bedframe for a full-size mattress (75" x 53"). Chef Renauld came up with this plan for two
3/16" thick metal plates to work around that odd-size mid-way
stanchion. The plan is to rivet each plate to the horizontal and
vertical rails to the rear and front of the stanchion; its sole purpose
is to accommodate the 75" long mattress. The plan pictured below looks
complicated, but basically Chef Renauld
wants holes in the plates for riveting and welding nuts. He's an
engineer; he plans the work, and then works the plan.

I'll jump ahead and show you what the metal plates look like right now. The sole purpose of the plates is to be a "drop-slot" for holding the mattress upright along the wall during the day and serving as the anchor for the future wood build-out of the bed platform. In this photo, the drop-slot frame is partially finished, being held temporarily with cleco fastners. A few more welding points need to be made after pulling out the clecos and dismantling the entire structure, then I'll spray-paint it. When it's completely dry next week, it will be permanently mounted with rivets, ready for the wood bedframe construction.

Here's what the "drop-slot" design (see orange box below) looks like in the 2-D plan.

The mattress plus linen/bedding will be secured in an upright sideways position along the wall during the day, similar to a Murphy Bed. Under the bench-seat will be my kayak, paddle, ramp, and SCUBA gear, accessible from the rear opening. Most importantly, the 8-foot 25-pound 24-inch wide kayak will slide out from under the bench (very easily on the rubber mat), directly to the rear doors. At night, I'll fold up two drop-leafs (attached side-by-side with self-closing Euro-hinges on the 25 1/2" wide bench-seat). Attached under the drop-leafs will be folding table legs that snap in position to hold the leafs parallel to the top of the bench-seat. I'll then have a 53" wide surface; simply bring the mattress down on top of it (weighs 34 pounds). During the day, when the mattress is in a secure upright position, I can fold up one of those drop-leafs for my laptop, meals, chessboard on rainy days, or whatever.
In
this photo, we had put the cleco fastners on so he could drill new
holes on the stanchion as well as the existing side and vertical rails
to line-up with the holes in the metal plates.

The metal plates were made lighter in weight by cutting out squares;
we need to eliminate unnecessary weight.
After we mark and drill four corners, Chef Renauld uses a plasma cutter
to cut-out the squares.

Then he uses a sander to smooth those burrs made by the plasma cutter.

He sands everything smooth . . . .

Meanwhile
I screw bolts on the five drop-slots to be finished with wood, and will
hold the mattress upright and anchor the future bench-seat/bed. Chef
Renauld welds the bolts and tosses the screws. He just wants the bolts
to never come off when he
attaches the wood with new screws.

Here's a welded partially-finished drop-slot.

He attaches these to the other metal part with a temporary wooden brace to make sure the measurement doesn't change . . .

And welds those together.


Although we're using steel for the plates, and using channel, flat
stock and other drop-slot components, we could have used wood or other
materials (aluminum or plywood for example). The reason Chef Renauld
decided on steel was because he knows I'll easily put 400,000 miles on
La Lair (with lots of vibrations and solid jars and whumps on those
secondary and dirt roads that I enjoy exploring). Plus he's comfortable
milling, welding, drilling, cutting, and working with metal.
While we wait for the paint-job to dry (in a couple of weeks), we'll move on to the next plan.
Electrical Schematics
Saturday, April 11, 2015
The panel box installed by Sportsmobile of Austin for the air
conditioning unit was a bit intimidating at first. The white wires go
there, the copper wires go there, the black wires go over there, but
what the heck is this lonely taped black wire? I was told to ignore it,
leave it alone.

I don't truly understand the jargon of electrical supplies and the
various hook-ups, but I tell myself it's OK to not understand. I
finished a book recently about Guglielmo Marconi,
the Italian inventor of wireless communication via electromagnetic
waves. When he was asked to explain electromagnetic waves, he humbly
admitted he did not understand how, why or what of electromagnetic
waves. If Marconi could set up antennas without understanding waves, I
can install a circuit without understanding electricity.
With photographs and emails between me and Chef Renauld and
Sportsmobile of Austin (who sent me a complimentary 15 amp circuit
breaker), and a review of many "how-to" websites
on installing an additional circuit breaker, plus the generous donation
of left-over cable wire from Chef Jim, I was encouraged to install a
circuit breaker myself. First, I needed to visualize a circuit for
electricity to travel. I came up with this electrical schematics design
to figure out where I wanted the cable wire strung. It starts at the
lower right, the dark blue power inlet is a 30 amp power inlet, the current then goes to a 30 amp surge protector,
then to that intimidating panel box (green), and then out to all the
appliances (air conditioning unit and future outlets and ceiling
lights). Only one side of the van will contain this circuit.

With no objections from anyone about my design, I began stringing
the yellow cable wire. I began in reverse until I had enough cable to
complete the full circuit, cut the cable, and returned the left-over
cable to Chef Jim. The last fixture (last mile) will be a hard-wired 3-foot strip of six outlets (purple in diagram above) which is intended for tech gear, then up to the enclosed channel along the ceiling to a fluorescent low-profile ceiling light,
then to the rear to another identical fluorescent ceiling light, down
to a second 3-foot strip of six outlets (intended for the kitchen area),
then back "home" to the panel box to hook-up the 15amp circuit breaker.
You may ask "why fluorescent? why not LED?" I've seen LED lights in
motorhomes and the brightness hurts my eyes, I see halo's everywhere.
Since my future ABS interior panels will be haircell textured white to
prevent halo's and shine, and the fluorescent lights have a diffuser, my
plan for just two 15W mini T5 bulbs, each with its own on/off button,
will be perfect for my senior cataract eyes.
The installation of the 15amp circuit breaker went without a hitch.
On the panel cover, I popped out the rectangular black plastic fascia
below the existing breaker and just followed online instructions to snap
it in at each end of the breaker. I won't be able to attach the lights
and outlets, however, until the second layer of insulation, bedframe,
kitchen area and ABS panels are installed this summer (with Chef
Renauld's huge help, to understand click here!).
In the meantime I'll need at least one strip of outlets for bare
necessities until I arrive at Chef Renauld's place (for charging the
bicycle and cooking), so I've temporarily hooked-up one strip. Looks
dangerous eh?

Flettner Vent Installation on Ribbed Roof
Monday, March 30, 2015
I've not had good experiences with vents on a trailer roof.
Either they allow too much sunlight and heat inside, or I forget to
close the vent when it's raining, or the fan's high-speed doesn't
improve air flow better than its low-speed, just a bit noisier. So when I
discovered the Flettner Vent
during an online search of trailer vents, I was smittened and quickly
bought it. Here was a wind-powered vent with no cover to open/close, no
worry about rain or sunlight infiltration, and no need for 12V power.
What I didn't think about more thoroughly, however, was the ProMaster's
ribbed roof. The ribs are more narrow than both the round and
narrow-based style Flettner Vents.

So, Chef Renauld offered to make plastic rib fillers, a technique some Sprinter and Promaster van owners have used on their ribbed roofs. This way, the vent will sit on a completely flat surface. The ribs are approximately .25 inches deep and have 45 degree angled sides, so Ron angled the plastic pieces appropriately.

It was a happy day when Chef Renauld's priority care package arrived with his masterpiece plastic rib fillers along with a choco-lime cheesecake, big fat short ribs and home smoked sausage. But one problem I hadn't considered until another custom recreational vehicle builder explained to me, the vent must be centered on a high rib to allow rain water to flow around it, and the rib fillers on the shallow ribs on each side of the high rib must not dam-up the rain. Oops!

So, I had to reverse Ron's top/bottom fillers and handsaw off half
the length of the former bottom fillers (now top fillers), to allow rain
to flow un-obstructed along the shallow ribs on each side of the vent
sitting on a high rib. This way, there would be no miniature bird baths
on my roof.
Now that I was ready to proceed, I used Ron's template for drilling the center hole and two locating holes on each side. I chose a place at the rear off-center for four reasons; the manufacturer recommends a rear position, a 30-inch wide air conditioning unit centered on the roof will block some wind in the center, the very center is not completely flat, and the future kitchen will be rear off-center.
Now that I was ready to proceed, I used Ron's template for drilling the center hole and two locating holes on each side. I chose a place at the rear off-center for four reasons; the manufacturer recommends a rear position, a 30-inch wide air conditioning unit centered on the roof will block some wind in the center, the very center is not completely flat, and the future kitchen will be rear off-center.

With one hole drilled and clamped down with a bolt and wingnut
included in Chef Renauld's care package, followed by a second hole
clamped down with another wingnut, I was then certain the third drilled
hole would be perfectly aligned.

Without Ron's template, these three holes wouldn't have been in a straight line.

Next, the hole saw operation; approached with some trepidation! With
Ron's 3.75" bi-metal hole saw and his large drill which had a screw-in
side handle, this operation was fairly easy. Chef Jim who loaned me his
tall step ladder and extension cord, and who frequently invites me over
for a traditional Sunday Dinner with marinated meats and all the
fixings, came to spot me and make sure I didn't screw up. Here I am,
holding my perfectly round metal trophy.

Next, I filed down the rough metal edges, dabbed the raw edges with
Rustoleum, and then positioned the lower rib fillers to drill the same
two locating holes. These fillers were then put aside for later
assembly.

With a caulking gun, I used alot of white silicone
on the upper rib fillers and placed them on each side of the high rib.
To make sure they would be completely level with the high rib, I placed a
weighted glass pie pan with saran wrap on the bottom, on top of the
entire area and let it cure for 20 hours before placing the vent on top.

I'm a slob with a caulking gun. Despite periodic caulking over the
last 40 years on projects inside my house, I've never acquired that
beading finesse which I admire in others.


When the upper rib fillers cured 20 hours, I again used silicone to
mount the base on the roof (which fit perfectly in the locating holes of
the rib fillers below), attached the top vent, and then went down below
to tighten the center nut.

Now that I've confessed to being a slob with silicone and caulk, I'm compelled to explain that the white speck at the vent's 9 PM position below isn't caulk, it's bird-doo.

Down below, I attached the lower unit and gently tightened the center nut (but not too tightly) and pushed the plug in the center to hide the nut.

The easily breakable plastic shutter (can be closed/opened) was popped in the groves of the base, and voila, the vent is ready to go.

This summer when Chef Renauld and I complete the ceiling with insulation and ABS panels, I'll trim and attach a vent extender to compensate for the thickness of the final ceiling. Here's what the extender looks like without a trim.

Will it leak in a furious
rain storm? When I drive away, will it quickly push out the heat
build-up, for example in an hour's grocery store parking lot? East Texas
is an excellent place to give this vent a workout. We're expecting a
few rain storms later this week. I'll revisit this post next week with a
review.
Here's a birds-eye view of the Flettner Vent and the Polar Cub AC unit
(installed last week by Sportsmobile of Austin, Texas). Notice the
condensation dripping down the sides of the van? Photo was taken just
prior to sunrise when humidity is usually 99 percent in East Texas.

UPDATE
April 19, 2015 - After a week of torrential rain storms daily and
nightly, I'm happy to report that neither the AC unit nor the vent leak
water or dampness. Everywhere inside, around and near the units is
completely dry.
Insulating with Insul-Bright Fabric, Will it Work?
Monday, March 16, 2015
I'm not making quick progress; I'm only about half done. Today, doubts began to creep into my thoughts when the sunny temperature outside hit 73 degrees, and inside the van was almost 90 degrees. I'm hoping this Insul-Bright will work. It's a super thin, super lightweight fabric designed to block heat with its mylar content. Unlike Reflectix and other similar materials which require a minimum of a 0.75” air space, Insul-Bright works without air space (can't and won't sacrifice the space) and it's much less expensive and requires only a scissors to cut.
Each day over 55 degrees while waiting for a section to dry, I took a photo. Here's my progress so far . . . .

Today when the inside van temp was climbing over 90 at Noon (73 degrees outside), it was a bit un-nerving to think I might be wasting my time on this unproven technique. I realize I'm only about 45 percent done. There's still more really hot metal surface areas to cover yet. Decided to do an experiment to test my doubts. I lined a glass jar with Insul-Bright around the insides and under the metal lid, put a little thermometer inside, and set it in a sunny spot on the porch. Three hours later and still in the sunlight, I quickly took off the lid, checked the thermometer, and hallejua it works! 83 degrees inside. I've now got a re-newed vigor to win this war against excessive heat in a metal box . . .

PS:
Follow-up, needed a "control" experiment for comparison. On another
73-degree sunny day, I put the same jar with metal lid on the same sunny
spot for only 2 hours but without Insul-Bright. When the outside
temperature climbed to 76 degrees, approximately the same temp as when I
concluded the Insul-Bright experiment, I removed the lid and quickly
checked the temp, it was 100.1 degrees. Conclusion? Insul-Bright blocks
heat significantly.

All Purpose Bag and Solar Shower on Rear Doors
Saturday, March 7, 2015

Used very heavy duty hooks
for the top, machine bolts and nuts, supported with one-inch thick
pieces of wood behind the metal. Two hooks for the bag and one for the
shower. Had to be careful not to interfere with internal door
mechanisms, so the best place to put the wood, hooks and clasps out of
harm's way was the determining factor of where to install the bag.
That's why the bags aren't centered on the door.

The
bottom and sides of the all-purpose bag have turn-clasps which keep the
bag from swinging (offer no support). For the bottom two clasps, I used
wood screws and glued one-inch thick wood behind the metal. The two
side clasps will wait till Ron helps me with the ABS sheet this summer.

Hooking up Portable XM SkyFi Home/Vehicle Unit
Saturday, January 24, 2015
Saturday, January 24, 2015
I have a portable XM SkyFi home/vehicle unit which I wanted to install in the cab of La Lair, and connect it to the manufacturer's satellite radio antenna already discreetly located on the roof above the cab.

So, I bought a vehicle XM cradle (almost extinct) with plastic easily-breakable clips on the back (for hooking into an air vent), a 3.5mm stereo audio cable, a 12V power cord and a satellite radio antenna extender to hook-into the ProMaster's satellite antenna (which is located on the roof above the cab area). The ProMaster Forum folks helped alot with advice. Instead of buying an official radio removal tool, I used nails (tried 3 nail sizes) and the perfect fit was a 3-inch heavy-duty construction nail. I gently inserted all four nails about 2 inches, and noticed the radio got loose. Then I gently pried out the radio (didn't remove nails) with the broad side of a thin metal nail file around the edges of the radio.

Behind the radio, the blue connector is the satellite radio antenna.

The
blue connector didn't come off by grasping and tugging it with my
fingers. It's on there pretty good!! With the same metal nail file,
using the broad side, I gently placed it between the blue connector and
the metal back of the radio, and pried up, moving all around the
connector. It took quite a bit of gentle prying but it eventually
loosened until I could pull it out with my fingers.

After
attaching my antenna extender, I used duct tape and taped the extender
cable off to the side, so that when I re-inserted the radio back in its
slot, nothing would get pinched. I then removed the dashboard clipboard
above the radio unit (two hex screws in front, above the radio) and ran
the antenna cable under and to the rear of the clipboard. When I put the
clipboard back together, the antenna cable now sticks out through the
generous joint/seam (cable isn't pinched) at the rear of the clipboard,
out of my view. I have a GPS unit on top of the clipboard, so the
antenna cable isn't terribly noticeable. I suppose I could have drilled a
small hole somewhere discreet to hide the antenna cable more, but
sometimes, trying to be discreet backfires!

And
voila, antenna cable (A) runs up near my side air vent to the
windshield area, and the power (P) and auxiliary audio (X) run under the
steering wheel to the connectors on the right side of the steering
wheel. I bought black 3/8" diameter FlexiRings (Lowe's) which are
adhesive-backed vinyl rings about 1" long with a slit to keep the cables
neatly together, out of the way and tangle-free.

Insulating Interior Cargo Space
Tuesday, January 20, 2015
La Lair has arrived finally. It's definitely a camper upgrade from
my 13-year-old Tacoma Toyota truck which had almost one-quarter million
miles on it. Don't have to pack my tent or sleep in the passenger seat
anymore!
The first modification I made was the addition of wind guards and universal-fit mudflaps which
I had purchased and mailed to the dealer to install. The mudflaps look
too tiny to me, but until there's a custom mudflap for Promasters, I'll
stick with these.

Decided to start alittle project - insulate the two rear doors with sound deadner and thermal protection. Real easy to cut Damplifier with utility knife, an old cutting board, and a yard stick as a straight edge.

Tools include alcohol and cloth to clean metal, crowbar (used gently with soft cloth) to pop out the black panels, cup to save plastic pins, and various sizes of Damplifier (the thin black squares) from Second Skin.

Damplifier is expensive but without some kind of sound deadening to stop the vibration of all that metal, I wouldn't be able to hear my radio. Fortunately I only need 25 percent coverage on flat metal (see red arrows) to cancel out the noisey vibration. This tip came from blog sites from the pro's - truck drivers who drive 12 hrs daily.


This roller came in handy for pressing the adhesive of the Damplifier and the gluing of Insul-Bright. Started from the center and rolled out like a pie crust.

Insul-Bright by the Warm Company is great to work with; extremely lightweight, easy to cut with dress-makers scissors, and non-fraying (not a weave), plus it's a breathable synthetic material and dries quickly if it gets damp or wet.

I dabbed Liquid Nails LN201 around the top and side edges of Insul-Bright, then glued its shiny mylar side to the inside metal surfaces exposed to the sun. Hopefully Insul-Bright will slow the transfer of heat to the inside cargo space. It's an unproven technique! Next year, I'll share my opinions on how well it works.

This door is almost done. Will fill cavities with strong-grade bubblewrap to slow air exchange, then a layer or two of Pactiv Extruded Polystyrene Foam Board, and later this summer with Chef Renauld's help, a white textured 1/16" ABS panel to cover the foam board.


The 1/4" Pactiv Foam Board might seem insignificant as an insulator,
but because the cavities in the cargo space vary from 1/4" on the middle
rear door to 2" or 3" in the sliding door, for example, this
easy-to-cut non-crumbling foam board can be double or triple-layered and
cut to the various sizes and cavities. And the bubblewrap is either
rolled, folded or used as a single layer to create an air space between
the Insul-Bright which is glued directly on the metal walls that are
exposed to sunshine and the Foam Board on the inside which will
hopefully keep cooled or heated air inside. Wishful thinking? Will do a
critical review next year.

Would like to do the same application, but worry how it wil "do" in a cold environment, means vapor will not collect under the Insul-Bright making metal walls rusted? (because Insul-Bright is not glued with full surface to metal surface... and what glue stuff are you using to glue foam boards?
ReplyDeleteThanks in advance,
John,
Manitoba
I don't think vapor is collecting anywhere because nothing is air-tight, the ABS at the high four corners (two up front, two in back) is open and the ABS at the low ground level is open, so seems to me, no vacuum or air-tight places. I used an auto-metal/fabric glue (dabbed slightly) on the insul-bright to the metal, but for the 1-inch foam boards, no glue, no adhesive, it just sits between the insul-bright and the ABS sheets, and I cut it loosely, so as to not touch the metal crossbeams or rub against any metal to avoid squeaks. For the 1/4" Pactiv foam, it bends easily, so it too stays in place by tucking it inside lips of the high and mid-waist rails, just tucked it in mostly, no glue or adhesive. The ABS sheets hold it in place. Nothing is rubbing against metal, and that way, no squeaks at all.
DeleteThis comment has been removed by the author.
ReplyDeleteTerri, how do you like your Flettner Vent?
ReplyDeleteAre you completely satisfies with it performance?
Thanks,
The jury's still out on the Flettner Vent, but I'm testing with thermometer all the time, just curious. There's several factors involved; one, I have no windows in the cargo area, two, I put a insul-bright curtain between the cab/cargo area (slit in the middle for access, stays mostly closed), and three, it's about high 30s in the morn and high 60s in the eve where I'm traveling now, and I've been driving alot (spins like crazy), so it's always cool about 65 degrees in the cargo area. It's going to take another year of driving/camping/traveling circumstances and testing temps for me to come to any conclusions about the Flettner Vent.
ReplyDeleteIt's very helpful post keep it up!
ReplyDelete